
How to connect an Audiocodes MediaPack to Microsoft Teams
In this blog post, I will guide you through the steps to connect an Audiocodes MediaPack to Microsoft Teams. This allows you to use your analoge phones with Microsoft Teams. Of course, it is not the cheapest solution and there are other options. But with Microsoft Teams, you can easily control and manage an analoge phone. For example, you can restrict outbound call destinations by assigning a voice routing policy. Or you can monitor the call quality for analog phone.
Audiocodes MediaPacks and Teams SIP gateway – an overview
In 2022 Microsoft released the first version of the Microsoft Teams SIP gateway. The basic idea is to connect native SIP devices to Microsoft Teams. In the beginning, Microsoft supported only Skype for Business Online certified IP desk phones. But already end of last year, Microsoft extended the SIP gateway by supporting certified DECT IP systems (you can find my posts about Spectralink and Poly on my blog).
Since 2023, Microsoft is supporting to connect Audiocodes MediaPack to Microsoft Teams (time by writing in Public Preview), and some other certified vendors, to Microsoft Teams.
Now you can connect legacy analoge devices to your Microsoft Teams platform and manage the call routing the same way as for a normal user. Or control call quality for these connected devices within the Teams Admin Center.
What we need to connect an Audiocodes MediaPack to Microsoft Teams, is:
- a supported Audiocodes MediaPack
- MP-11X FXS
- MP-124 FXS
- MP-202
- a current Audiocodes firmware release ( at least 6.60A.365)
- a licensed Microsoft Teams user with Phone system addon
- Microsoft Teams SIP gateway must be enabled in your Tenant
I’ve wrote a blog post about how to enable the SIP gateway in your Teams Admin center and you can find it here.
Configure the Audiocodes MP-112 device
Firmware Update
Before you can connect the MediaPack to Microsoft Teams, you need to check and upgrade the firmware of the device, if required. The MediaPack requires at least firmware version 6.60A.367.1. To upgrade the firmware, access the WebUI management interface of the MediaPack by browsing to the device IP (default: https://10.1.10.10) and login with the credentials (default: Admin/Admin).
You can check the current firmware version on the status & diagnostics page of the device:

If the firmware version is older than 6.60A.367, update it by starting the software upgrade wizard from the Maintenance menu and installing the latest firmware release.

Initiate a reboot after the firmware installation and wait till the MP device is accessible again.
Prepare the Audiocodes MP-112 device
The Microsoft provisioning configures most of the MP parameters, so only a few parameters need a change. Depending on your scenario, a static IP configuration of the MP device may be helpful, for example.
Please note that the MP device no longer responds after an IP change. You must first open the WebUI with the new IP address and burn the configuration change before you can continue with the device configuration.
Configure Microsoft Teams provisioning URL
To configure the MP device with the Microsoft provisioning service, you open the admin page of the MP device (https://<MP device IP>/AdminPage – case sensitive) and set or verify the following parameter:
| parameter | required value | description |
| IniFileURL | http://<region URL>/mac.ini | Provides a link to an ini file to be downloaded from a remote server. Microsoft provides different provisioning URL for US, EU and APAC region. Select the right one from the this list here. Note the “/mac.ini” at the end of the URL. It is mandatory for the MP configuration. |
| AUPDResetURLOnWebConfig | 1 | Enables to reset the ini file url when configuration is altered via WEB |
| SetDefaultOnIniFileProcess | 1 | Determine if all parameters are set to their defaults before processing updated INI File |

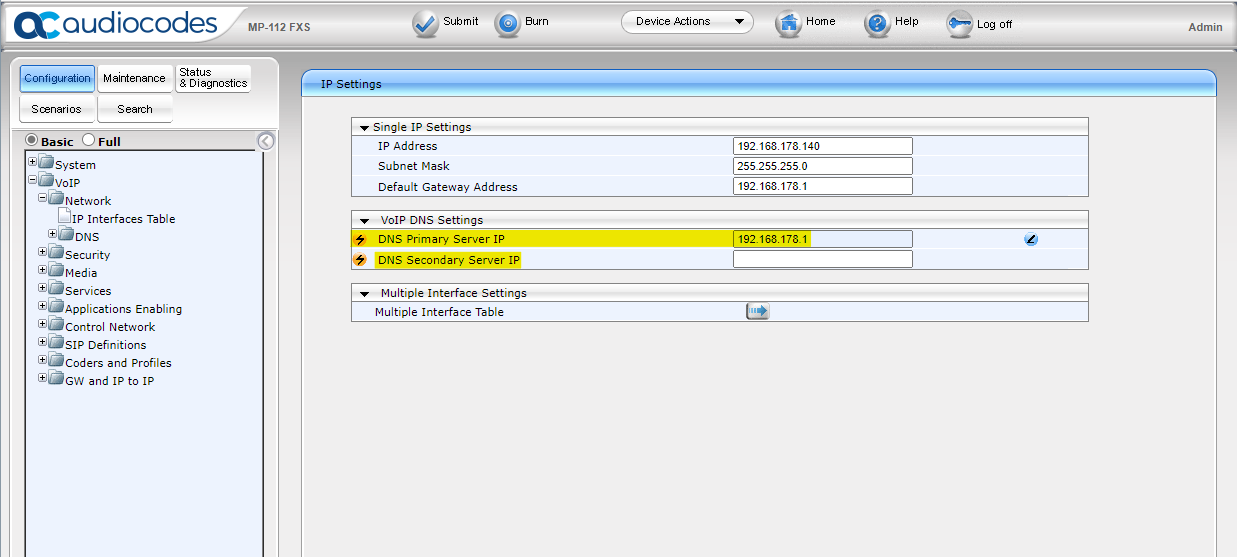
The Audiocodes MP device loads the configuration file from Microsoft and reboots automatically after a few seconds. Also note, that after the MP device loaded the configuration, following information are cleared and needs to set manually:
- Syslog Server and Syslog Server settings (if configured and needed)
- DNS Server settings
As result of the missing DNS server information, the MP cannot resolve any FQDN and a connect to Microsoft Teams is not possible. Therefore, set a DNS server manually and reboot the MP device.
After the reboot of the MP device, it should be ready to connect an analog phone.
Connect the Audiocodes MP-112 to Microsoft Teams
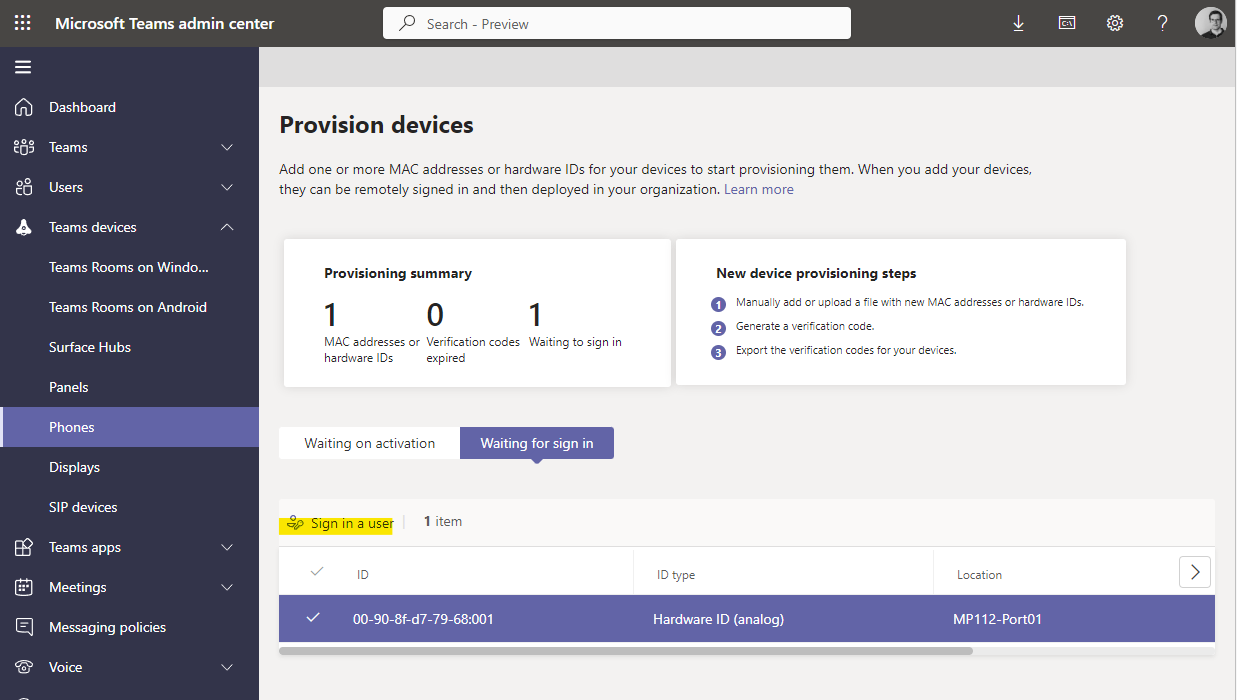
Now it’s time to connect the MediaPack with Microsoft Teams. To do so, open the Microsoft Teams Admin Center and go to Phones submenu in the Teams devices section. Click on the Actions menu on the right upper corner and select Provision devices.

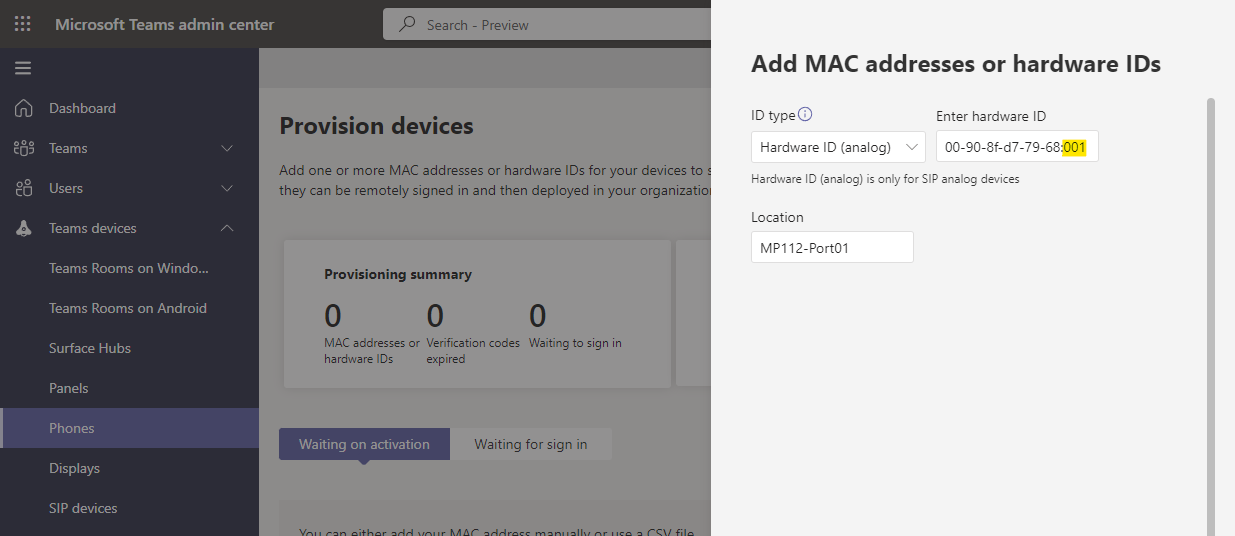
Start the provisioning assistant by clicking on Add MAC addresses.
In the dropdown IP type, select Hardware ID (analog) and enter the MAC address of the MP device plus the suffix :001 for port 1 or :002 for port 2. If you have a MP-124 you need to adjust the port numbers accordingly.
Next, you need to generate a verification code and active the MP device using the analog phone. Select the port you would like to activate and click on Generate verification code.
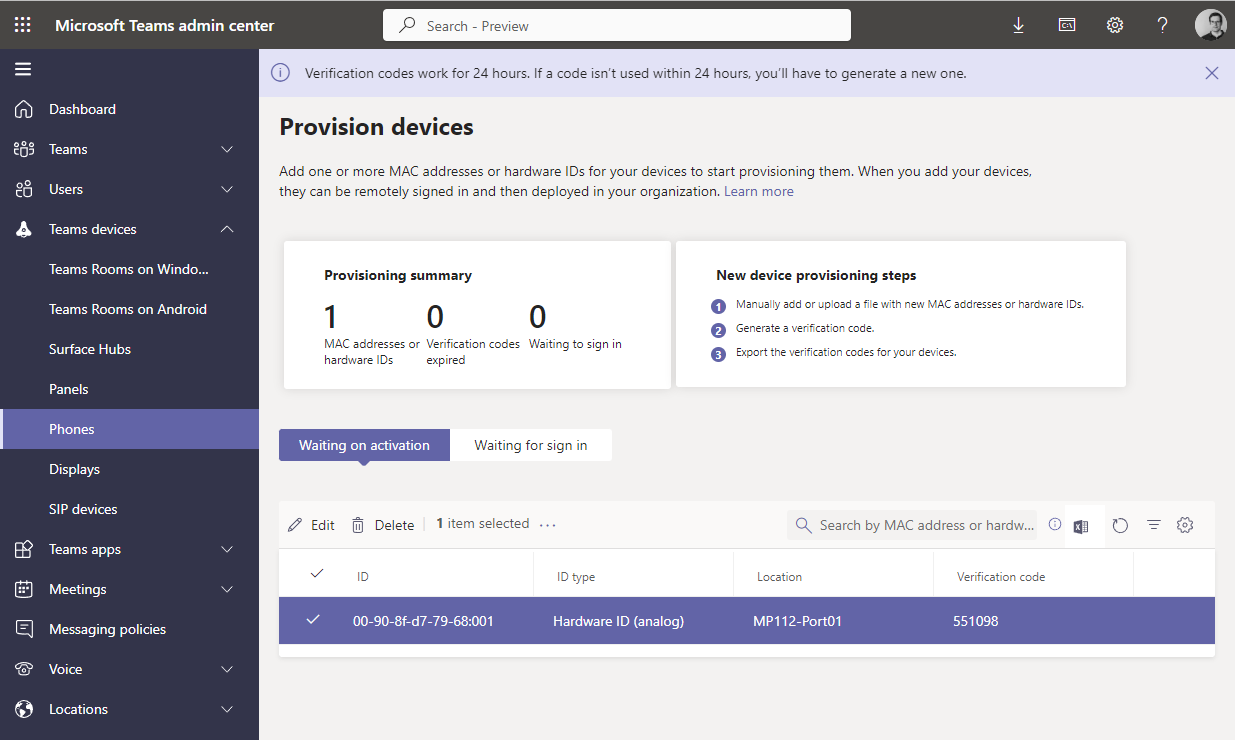
Go to your analog phone and dial *55*<verification code> and pick up the phone. After a few seconds, you should hear a confirmation tone from Microsoft. In the TAC, the MP device is now listed in the section Waiting for sign in.
Select the phone and start the sign process.
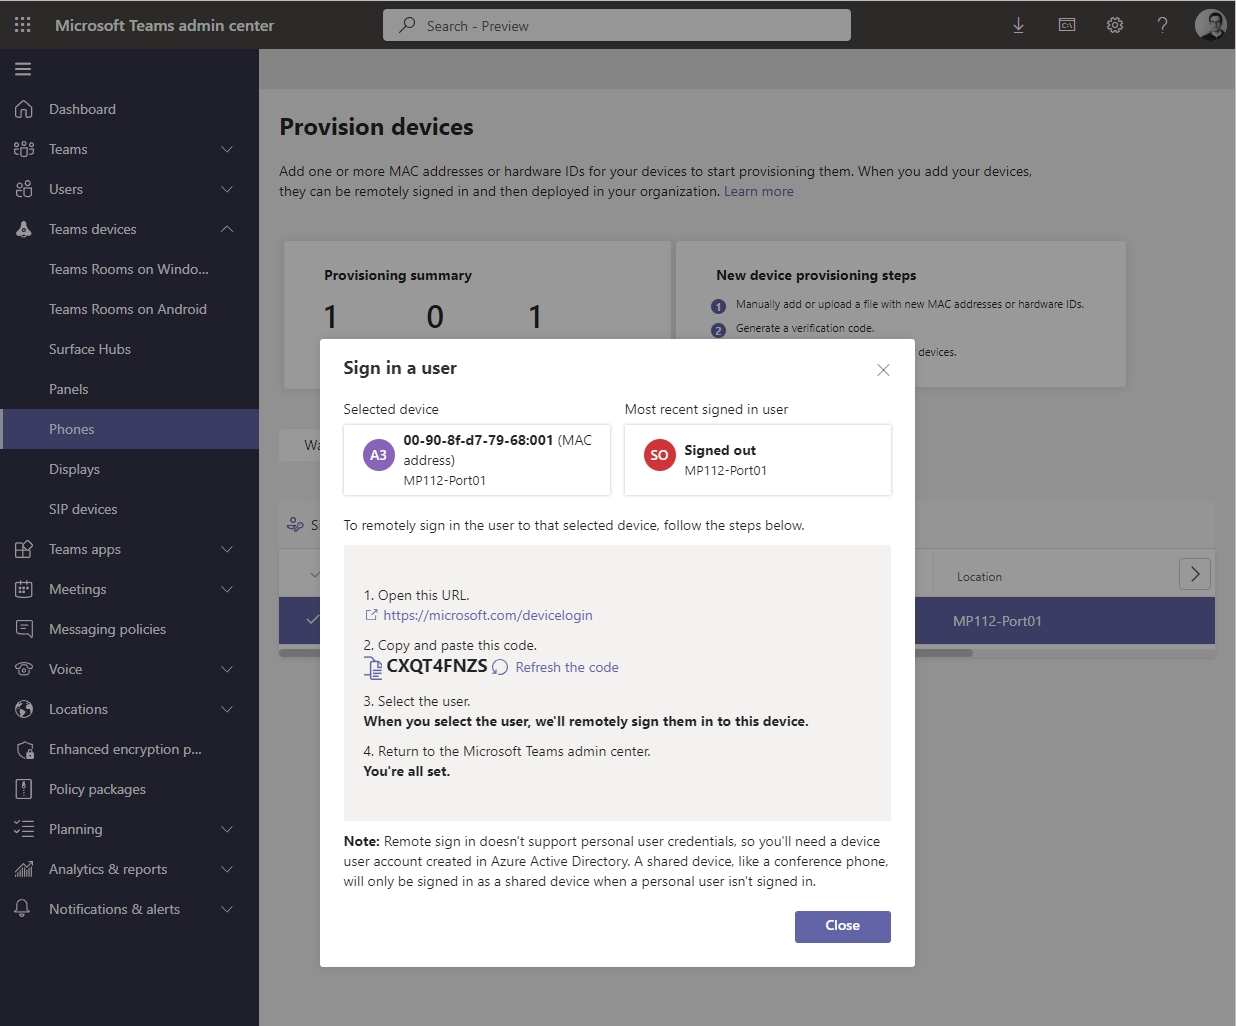
For the user sign, open a web browser, go to https://aka.ms/devicelogin and enter the device code. Log in with the user account you want to assign to the phone.


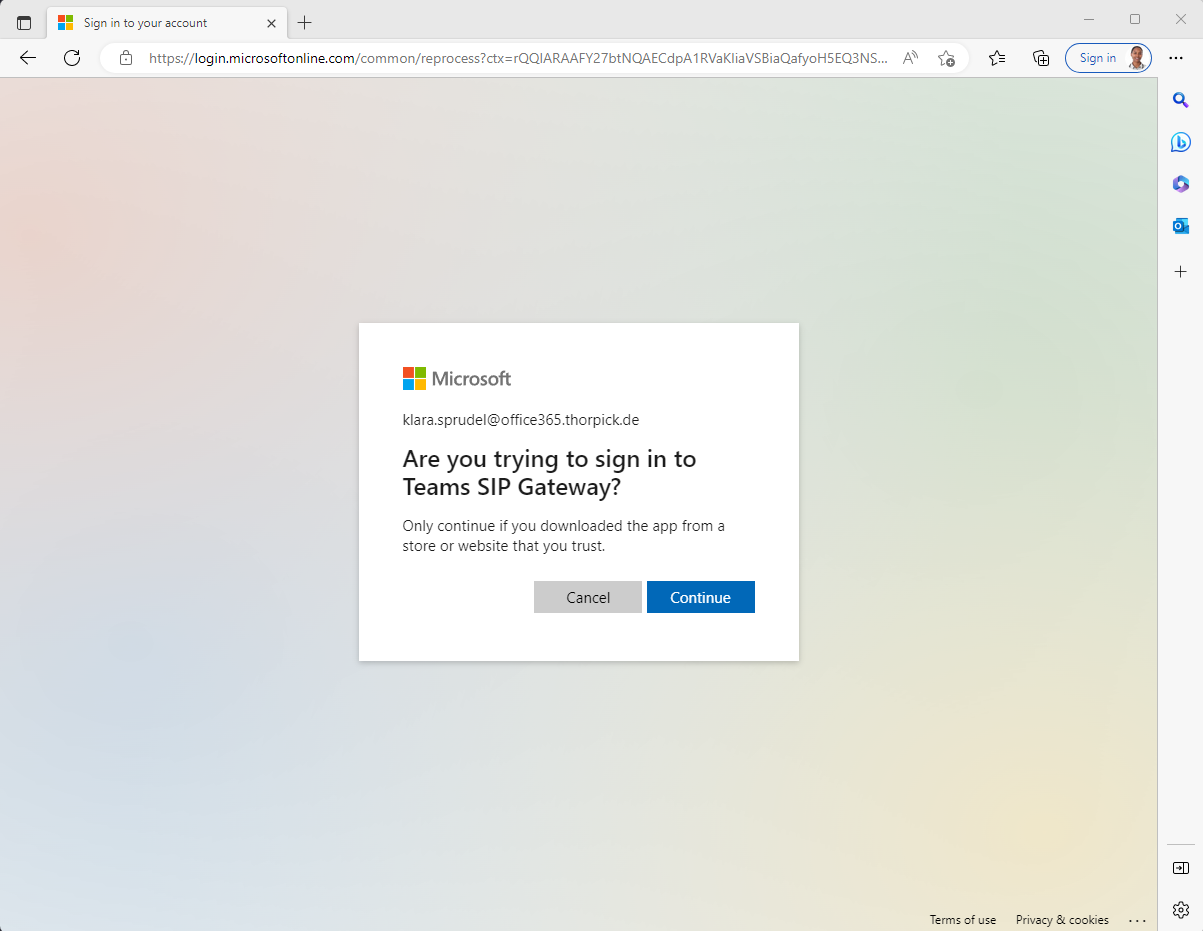

That’s it. The phone should now be connected to the Microsoft Teams platform.
Things to consider
Microsoft Teams SIP Gateway and presence
If you logon an analoge phone with the Microsoft Teams SIP gateway and do not use the Teams Desktop client with the same account in parallel, the presence of this user is offline almost all the time. Only when someone picks up the phone for a call does the presence status change to “In a call”.
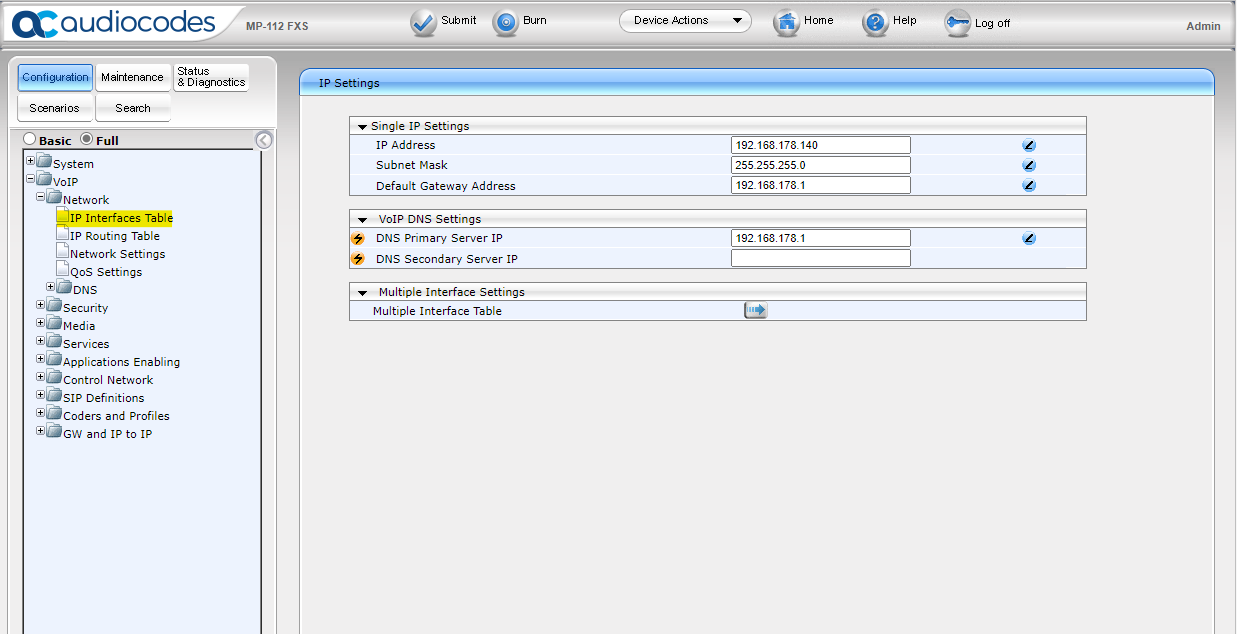
Check DNS Server settings before applying the Microsoft provisioning
When configuring the IniFileURL, make sure that the the DNS server settings are configured correctly. Otherwise, the MP device cannot resolve the Microsoft provisioning URL and discard the configuration change.
Check DNS Server settings after applying the Microsoft provisioning
Note the circumstance that the DNS server setting is cleared after the provisioning of the MP device by Microsoft.
Reset the Audiocodes MediaPack to factory defaults
A reset to factory settings by loading an empty file is not working anymore. You need to reset the device by disconnecting the ethernet cable and press the reset button for at least six seconds. Otherwise, the MP device will reload a clean provisioning file from the Microsoft server.


